
Youth’s Lessons: The Slingshot – Part 2, by J.M.
(Continued
from
Part
1.)
On
any
frame
with
forks
there
are
also
two
options
for
the
orientation
of
how
the
bands
are
attached
to
the
forks
–
Through
The
Forks
(TTF)
or
Over
The
Top
(OTT).
TTF
means
that
the
bands
come
around
the
sides
of
the
forks,
and
the
ammo
passes
through
the
forks
roughly
centered
on
the
bands.
OTT
means
the
bands
come
over
the
top
of
the
forks,
and
the
ammo
comes
out
roughly
centered
on
a
line
across
the
tops
of
the
forks.
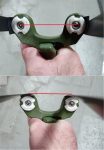
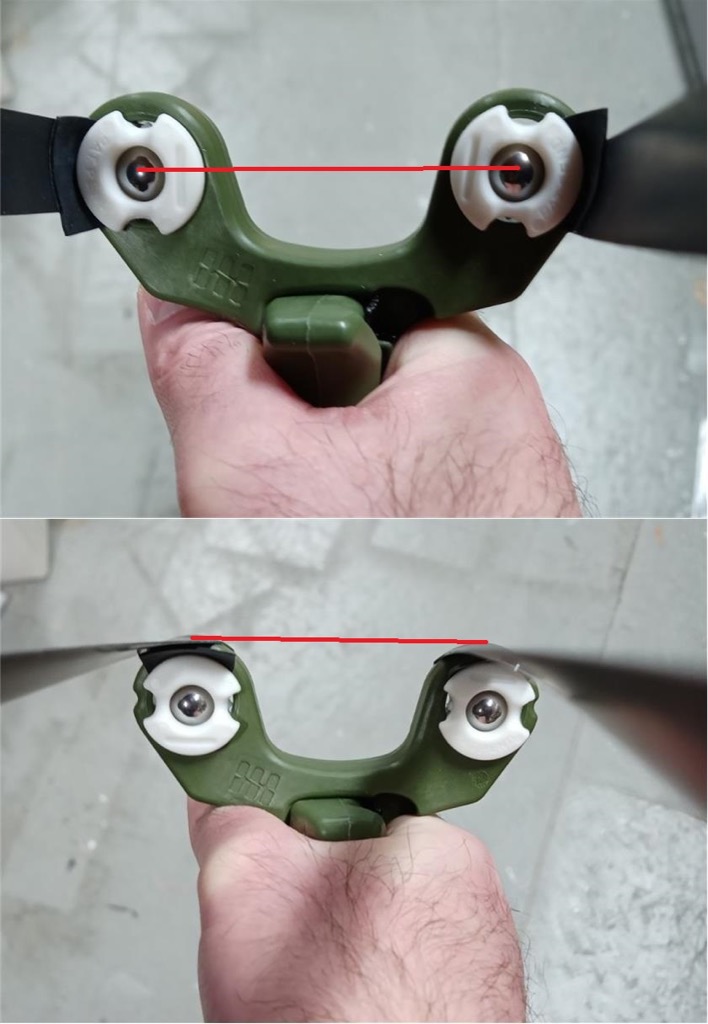
Here’s
a
picture
that
illustrates
the
two
layouts
(TTF
on
top,
OTT
on
bottom).
The
red
line
on
each
illustrates
the
approximate
level
at
which
the
ammo
will
pass
through
the
forks
when
it’s
shot:
The
OTT
layout
is
slightly
safer
for
beginners,
as
it
reduces
the
risk
of
the
ammo
hitting
your
hand/fingers
or
the
frame
since
it
positions
the
path
the
ammo
travels
further
away
from
your
squishy
parts.
However,
think
of
a
lever
with
your
wrist
as
the
pivot
point
–
the
further
away
from
your
wrist
the
bands
are
the
more
leverage
the
slingshot
will
exert
on
your
wrist,
reducing
the
maximum
strength
of
the
bands
you
can
pull.
You
can
find
people
that
swear
by
one
method
or
the
other,
so
I’d
recommend
trying
both
as
you
gain
experience
and
confidence
and
seeing
which
works
best
for
you.
I
find
that
I
use
both
orientations
depending
on
which
slingshot
I’m
shooting.
Note
that
some
slingshots
are
designed
specifically
to
attach
bands
only
one
way,
while
others
support
both
orientations.
Fork
width
is
another
variable
in
frame
design
–
forks
that
are
further
apart
are
better
for
beginners
since
they
allow
for
a
much
wider
margin
of
error
to
minimize
forks
strikes,
but
they’re
also
larger
and
bulkier.
Moving
down
the
fork
length/width
hierarchy,
a
Pickle
Fork
Slingshot
(PFS)
is
one
that
barely
has
anything
that
could
be
considered
forks.
There’s
usually
a
small
slot
in
the
center
to
allow
some
minimal
room
for
the
ammo
to
pass
through,
and
they
almost
always
only
support
an
OTT
band
attachment.
Some
shooters
consider
pickle
forks
to
be
more
accurate
and
powerful
than
longer
fork
options,
but
they
take
a
lot
of
practice
and
skill
to
avoid
hitting
the
frame
or
your
hand.
Here’s
a
good
video
that
discusses
what
they
are
and
how
to
shoot
them.
There
are
also
frames
without
any
forks
–
this
is
the
forkless
slingshot,
also
known
as
a
‘stick’
slingshot
or
a
‘stick
shooter’.
This
is
simply
a
stick
with
the
bands
attached
to
the
top
(OTT
obviously).
It’s
a
lot
simpler
to
make,
and
shooting
it
is
very
similar
to
shooting
a
Y
slingshot.
Here’s
a
good
video
of
a
Stick
Shooter.
One
cool
variation
of
a
stick
shooter
is
to
use
a
long
stick
and
instead
of
holding
the
stick
vertically
in
your
hand
when
shooting
it,
you
hold
it
with
the
top
pointing
at
the
target
and
draw
the
band
along
the
length
of
the
stick.
This
allows
you
to
use
longer
bands
which
can
give
you
a
more
power,
and
it
can
be
a
more
accurate
since
you
can
point
the
stick
at
your
target
to
aim.
Here’s
a
good
example.
As
I
mentioned
earlier,
with
any
frame-based
slingshot
that
you
hold
in
your
hand
an
important
point
to
keep
in
mind
is
that
the
frame
acts
as
a
lever
with
your
wrist
as
a
pivot
point
when
you
pull
back
on
the
bands
–
the
further
from
your
hand
the
bands
are
attached,
the
longer
the
lever.
Longer
forks
or
frames
and
OTT
band
attachment
can
reduce
the
risk
of
a
hand/frame
strike,
which
means
hitting
your
hand
or
frame
with
the
ammo
instead
of
it
passing
cleanly,
but
they
also
reduce
the
strength
of
the
bands
you
can
use,
since
your
wrist
can
only
resist
a
certain
amount
of
pivot
force.
There’s
also
something
of
an
odd
man
out
in
regards
to
framed
slingshots
–
the
circular
frame.
A
company
called
Pocket
Shot
makes
a
small
circular
frame
that
you
attach
a
stretchable
pouch
to;
you
place
the
ammo
into
the
bottom
of
the
pouch,
grasp
the
ammo,
stretch
the
pouch,
and
then
release
to
fire
the
ammo
through
the
frame
opening.
It’s
a
pretty
compact
and
powerful
device
(they
claim
up
to
350
fps),
and
they
offer
different
pouches
and
other
options
to
add
flexibility.
Aiming
is
usually
instinctive,
but
I’ve
found
that
it’s
pretty
easy
to
become
accurate
with
a
little
practice.
One
big
advantage
of
the
Pocket
Shot
is
reloading
speed
–
you
just
drop
the
ammo
into
the
pouch
and
it
automatically
falls
into
the
right
position.
They
also
offer
a
handle
called
the
‘Hammer’
that
you
can
attach
to
the
circular
frame
to
make
it
more
like
a
traditional
slingshot.
I
have
one
and
like
shooting
it,
but
my
one
complaint
is
that
you
don’t
have
access
to
the
wide
range
of
options
in
frames
and
bands
that
you
get
with
more
traditional
slingshots
(although
some
people
might
consider
that
a
benefit
–
less
complexity).
For
those
of
you
that
don’t
like
being
framed,
there’s
an
entire
class
of
slingshot
shooting
called
‘frameless’
or
‘bareback’.
Remember
looping
a
rubber
band
between
your
thumb
and
forefinger
and
shooting
paper
clips
when
you
were
a
kid?
This
is
essentially
the
same
thing,
just
all
grown
up
and
a
lot
more
powerful.
Frameless
can
consist
of
a
small
ring
that
the
band
attaches
to
that
goes
around
your
pinkie
or
other
finger
to
anchor
it,
or
it
can
be
a
simple
loop
of
band
material
with
a
pouch
attached.
Most
people
use
their
fingers
as
forks
when
they
shoot
frameless,
although
you
can
also
shoot
across
the
surface
of
your
hand
or
over
your
knuckles.
The
big
advantages
to
frameless
shooting
are
simplicity
and
compactness
–
you
don’t
have
to
mess
with
any
frame,
and
you
can
fit
an
entire
slingshot
into
the
coin
pocket
of
your
jeans.
However,
since
the
strain
of
supporting
the
bands
is
now
on
your
hand
and
fingers,
their
strength
becomes
an
additional
limiting
factor
for
power
instead
of
just
your
wrist.
Shooting
a
frameless
slingshot
tends
to
be
a
more
advanced
skill,
so
it’s
not
necessarily
the
best
way
to
get
started
in
the
sport.
For
any
slingshot
with
a
frame
or
a
ring
you’ll
need
some
way
to
securely
attach
the
bands.
There
are
a
couple
of
methods
commonly
used:
-
Tying/Lashing
–
The
bands
are
placed
on
the
frame
and
thin
pieces
of
string
or
cut
band
are
wrapped
around
them
to
tightly
secure
them
to
the
frame
(Example);
many
frames
have
a
shallow
notch
in
them
to
provide
additional
grip
for
where
it’s
tied.
I’ve
also
used
small
3”
zip
ties
to
attach
bands
to
a
frame,
but
keep
in
mind
that
zip
ties
have
sharp
edges,
so
using
them
can
reduce
the
life
of
your
bands. -
Screw-on
Clip
–
Some
manufacturers
design
their
forks
to
use
small
clips
that
are
screwed
tightly
down
on
top
of
the
bands
to
hold
them
in
place.
SimpleShot’s
FlipClip
is
a
good
example
of
this. -
Ball
Wedge
–
If
a
slingshot
has
a
hole
in
the
forks
you
can
push
the
band
through
the
hole,
insert
a
small
ball
bearing
that’s
about
the
same
size
as
or
slightly
larger
than
the
hole
into
the
tube/band,
and
then
pull
it
back
so
the
band
around
the
bearing
causes
it
to
wedge
in
tightly. -
Plugs
–
These
are
similar
to
using
a
ball
bearing
wedge,
but
with
a
larger
plug
specifically
designed
to
wedge
into
a
hole
in
the
frame
which
is
used
to
hold
the
band
in
place.
SimpleShot’s
Ocularis
is
one
of
the
best-known
examples
of
this. -
Flip-up
Clip
–
This
is
similar
to
a
screw-on
clip,
but
the
clip
is
permanently
attached
to
the
frame
and
folds
up
and
down
to
lock
and
unlock.
Snipersling’s
S-Pangolin
is
an
example. -
Looped
–
Some
slingshots
have
a
loop
formed
on
the
end
of
the
frame
with
a
small
open
notch
that
you
can
simply
slip
each
side
of
a
stretched
looped
band
through. -
Friction
–
This
is
a
method
most
of
you
are
probably
already
familiar
with
from
the
classic
Daisy
and
Barnett
slingshots.
The
frame
is
made
of
thick
wire
and
a
tubular
band
is
slipped
over
the
ends
of
the
frame,
with
friction
keeping
them
in
place.
This
list
isn’t
comprehensive
–
there
are
other
ways
to
attach
bands,
but
these
are
the
most
common.
If
you’re
going
to
be
using
a
slingshot
to
put
food
on
the
table
I
highly
recommend
going
with
an
attachment
method
that
allows
easy
band
replacement
in
the
field,
since
bands
do
break
occasionally.
The
flip-up
clips
are
the
most
obvious,
but
there
aren’t
many
manufacturers
that
offer
them
as
an
option.
My
personal
favorite
for
field
use
is
the
Slimple
Shot
FlipClip
X
with
the
optional
thumb
screws
–
it
takes
less
than
a
minute
to
change
a
band
and
there
are
no
extra
fiddly
bits
or
tools
to
carry
or
lose.
The
Torque
from
SimpleShot
is
another
good
option
for
quick
band
changes
and
is
kind
of
unique
in
that
it
supports
both
the
FlipClip
X
as
well
as
looped
bands
by
virtue
of
having
small
slits
in
the
forks.
(To
be
continued
tomorrow,
in
Part
3.)